Friday, 10 February 2017

HOW TO USE THE JAVA EMBEDDING IN ORACLE BPEL


      The Java Embedding activity allows us to add activities in a BPEL process in which we can write a Java snippet using standard JDK libraries, the BPEL APIs, custom and 3rd party Java Classes included in JAR files in deployed SCA composites (in SCA-INF/lib directory) and Java Classes and libraries available on the Classpath for the SOA Suite run time.


I will show the creation of the Hello World of Java Embedding – a very simple BPEL process that has a string as an input and a string as output. This simple process contains a Java Embedding activity that uses Java to:
  • Write a line of log output to the console
  • Set the name for the composite instance
  • Access the name element in the input parameter
  • Set the value on the output parameter
  • Write an entry in the BPEL audit trail
1.Create a SOA project "JavaEmbedPro"


2.Create a  synchronous Bpel "JavaEmbedBpel"


3.Open the Bpel editor and intialize the output for  the BPEL.


4.Drag and drop the Java Embedding under Oracle Extensions in the BPEL editor.


5.The code in the Java Embedding activity is the following:


6.The XMLElement class used in this snippet is not part of the standard JDK APIs. Therefore, this class has to be imported in the BPEL process, using a special import element:

<import location="oracle.xml.parser.v2.XMLElement" importType="http://schemas.oracle.com/bpel/extension/java"/>


7.Snippet uses a number of the API methods available for use in Java Embedding:
  • getVariableData() - to access variables in BPEL process
  • setVariableData – to set the value on variables
  • addAuditTrailEntry() – add an entry to the audit trail
  • getPreference() – access preference (property)
  • setCompositeInstanceTitle() - set the title that is displayed in the EM FMW Console
  • getInstanceId( ) -get value of Unique ID associated with this BPEL process instance
  • setStatus(), setTitle(), setCreator รข€“ set meta data on process instance
  • setIndex() - set up to 6 index variables that can be used to query process instances through the BPEL API
8.Now we can deploy and test the process


Input Payload


Output Payload


Tuesday, 7 February 2017

HOW TO CONVERT THE EXCEL FILE INTO PDF USING JAVA


Please find the below code to convert the Excel file into PDF using Java\


/*
 * To change this license header, choose License Headers in Project Properties.
 * To change this template file, choose Tools | Templates
 * and open the template in the editor.
 */
package excelConversion;

/**
 *
 * @author aravindkumar.k
 */
import java.io.FileInputStream;
import java.io.*;
import org.apache.poi.hssf.usermodel.HSSFWorkbook;
import org.apache.poi.hssf.usermodel.HSSFSheet;
import org.apache.poi.ss.usermodel.*;
import java.util.Iterator;
import com.itextpdf.text.*;
import com.itextpdf.text.pdf.*;

public class excel2pdf {
        public static void main(String[] args) throws Exception{
                //First we read the Excel file in binary format into FileInputStream
                FileInputStream input_document = new FileInputStream(new File("D:\\Test\\ADF_Doc.xls"));
                // Read workbook into HSSFWorkbook
                HSSFWorkbook my_xls_workbook = new HSSFWorkbook(input_document);
                // Read worksheet into HSSFSheet
                HSSFSheet my_worksheet = my_xls_workbook.getSheetAt(0);
                // To iterate over the rows
                Iterator<Row> rowIterator = my_worksheet.iterator();
                //We will create output PDF document objects at this point
                Document iText_xls_2_pdf = new Document();
                PdfWriter.getInstance(iText_xls_2_pdf, new FileOutputStream("Excel2PDF_Output.pdf"));
                iText_xls_2_pdf.open();
                //we have two columns in the Excel sheet, so we create a PDF table with two columns
                //Note: There are ways to make this dynamic in nature, if you want to.
                PdfPTable my_table = new PdfPTable(2);
                //We will use the object below to dynamically add new data to the table
                PdfPCell table_cell;
                //Loop through rows.
                while(rowIterator.hasNext()) {
                        Row row = rowIterator.next();
                        Iterator<Cell> cellIterator = row.cellIterator();
                                while(cellIterator.hasNext()) {
                                        Cell cell = cellIterator.next(); //Fetch CELL
                                        switch(cell.getCellType()) { //Identify CELL type
                                                //you need to add more code here based on
                                                //your requirement / transformations
                                        case Cell.CELL_TYPE_STRING:
                                                //Push the data from Excel to PDF Cell
                                                 table_cell=new PdfPCell(new Phrase(cell.getStringCellValue()));
                                                 //feel free to move the code below to suit to your needs
                                                 my_table.addCell(table_cell);
                                                break;
                                        }
                                        //next line
                                }
               
                }
                //Finally add the table to PDF document
                iText_xls_2_pdf.add(my_table);                      
                iText_xls_2_pdf.close();              
                //we created our pdf file..
                input_document.close(); //close xls
        }
}

HOW TO WRITE THE DATABASE THE RECORDS ON TO THE TEXT FILE


Please find the below code to wite the database record on to the text File


/*
 * To change this license header, choose License Headers in Project Properties.
 * To change this template file, choose Tools | Templates
 * and open the template in the editor.
 */
package test;

import com.jcraft.jsch.Channel;
import com.jcraft.jsch.ChannelSftp;
import com.jcraft.jsch.JSch;
import com.jcraft.jsch.Session;
import java.io.BufferedWriter;
import java.io.File;
import java.io.FileInputStream;
import java.io.FileWriter;
import java.sql.Connection;
import java.sql.DriverManager;
import java.sql.ResultSet;
import java.sql.Statement;
import java.text.DateFormat;
import java.text.SimpleDateFormat;
import java.util.Date;
import java.sql.PreparedStatement;

/**
 *
 * @author Aravind
 */
public class Test {
    public static void main(String args[]){
        try{  
                Class.forName("oracle.jdbc.driver.OracleDriver");  
               
 Connection con; con=DriverManager.getConnection("jdbc:oracle:thin:@localhost:1521:orcl","system","system");  
                String selectTableSQL = "SELECT *from employees";
                Statement statement =con.createStatement();
                PreparedStatement ps=null;  
                String updateQuery="";
                
                ResultSet rs = statement.executeQuery(selectTableSQL);
                
                File f = new File("TransactionDetails");
               
                     
                     DateFormat df = new SimpleDateFormat("dd.MM.yy_HH.mm.ss");
                     Date dateobj = new Date();
                     String date=(df.format(dateobj)).toString();
                     String fileName="TransactionDetails/emp"+date+".txt";


                f.mkdir();
                BufferedWriter bw = new BufferedWriter(new FileWriter(fileName));
                
                StringBuilder  details = new StringBuilder();
                
               details.append(System.getProperty("line.separator"));
                
                
                while (rs.next()) {
                    
                    details.append(rs.getString("empID") + "  " + rs.getString("empName") + "  "
                        +rs.getString("empSalary"));
                    
                    details.append(System.getProperty("line.separator"));
                    
                }
                bw.write(details.toString());
                bw.flush();
                System.out.println("Success");
                
            
            }
            catch(Exception e){
                System.out.println(e);
            
            }
    }
}

How to import the Excel file into Oracle Table Using Java


Please find the below code to import the Excel File into the Oracle Table


/*
 * To change this license header, choose License Headers in Project Properties.
 * To change this template file, choose Tools | Templates
 * and open the template in the editor.
 */
package test;

import java.sql.Connection;
import java.sql.DriverManager;
import java.sql.PreparedStatement;
import org.apache.poi.ss.usermodel.Row;
import org.apache.poi.xssf.usermodel.XSSFSheet;
import org.apache.poi.xssf.usermodel.XSSFWorkbook;

/**
 *
 * @author Aravind
 */
public class App {
    public static void main(String args[]){
        try { 
                Class.forName("oracle.jdbc.driver.OracleDriver");  
                Connection con=DriverManager.getConnection("jdbc:oracle:thin:@localhost:1521:orcl","system","system");
                System.out.println("");
                con.setAutoCommit(false);
                PreparedStatement pstm = null;
                String destDir="C:\\Users\\Desktop\\test.xlsx";
                System.out.println("destDir==> "+destDir); 
                XSSFWorkbook workBook = new XSSFWorkbook(destDir); 
                XSSFSheet sheet = workBook.getSheetAt(0); 
                int totalRows = sheet.getPhysicalNumberOfRows(); 
                System.out.println("total no of rows >>>>"+totalRows); 
                Row row;
                for (int i = 1; i <= sheet.getLastRowNum(); i++) {
                    row = (Row) sheet.getRow(i);
                    String name = row.getCell(0).getStringCellValue();
                    String add = row.getCell(1).getStringCellValue();
                    int  contact = (int) row.getCell(2).getNumericCellValue();
                    String email = row.getCell(3).getStringCellValue();
                    System.out.println(name+":My EMAIL address is "+email);
                    String sql = "INSERT INTO TEST_EMPLOYEE (NAME, ADDRESS, CONTACT, EMAIL) VALUES('" + name + "','" + add + "'," + contact + ",'" + email + "')";
                    pstm = (PreparedStatement) con.prepareStatement(sql);
                    pstm.execute();
                    System.out.println("Import rows " + i);
                }
                con.commit();
                pstm.close();
                con.close();
                System.out.println("Success import excel to my table");
        }
        catch(Exception e){
        }
    }
}
    

Wednesday, 23 November 2016

Digital Signature


A digital signature (not to be confused with a digital certificate) is a mathematical technique used to validate the authenticity and integrity of a message, software or digital document.

The digital equivalent of a handwritten signature or stamped seal, but offering far more inherent security, a digital signature is intended to solve the problem of tampering and impersonation in digital communications. Digital signatures can provide the added assurances of evidence to origin, identity and status of an electronic document, transaction or message, as well as acknowledging informed consent by the signer.

In many countries, including the United States, digital signatures have the same legal significance as the more traditional forms of signed documents. The United States Government Printing Office publishes electronic versions of the budget, public and private laws, and congressional bills with digital signatures.

How digital signatures work:


Digital signatures are based on public key cryptography, also known as asymmetric cryptography.

Using a public key algorithm such as RSA, one can generate two keys that are mathematically linked: one private and one public.

To create a digital signature, signing software (such as an email program) creates a one-way hash of the electronic data to be signed.

The private key is then used to encrypt the hash. The encrypted hash -- along with other information, such as the hashing algorithm -- is the digital signature.

The reason for encrypting the hash instead of the entire message or document is that a hash function can convert an arbitrary input into a fixed length value, which is usually much shorter.

This saves time since hashing is much faster than signing.

The value of the hash is unique to the hashed data.

Any change in the data, even changing or deleting a single character, results in a different value.

This attribute enables others to validate the integrity of the data by using the signer's public key to decrypt the hash.

If the decrypted hash matches a second computed hash of the same data, it proves that the data hasn't changed since it was signed.

If the two hashes don't match, the data has either been tampered with in some way (integrity) or the signature was created with a private key that doesn't correspond to the public key presented by the signer (authentication).

A digital signature can be used with any kind of message -- whether it is encrypted or not -- simply so the receiver can be sure of the sender's identity and that the message arrived intact. Digital signatures make it difficult for the signer to deny having signed something (non-repudiation) -- assuming their private key has not been compromised -- as the digital signature is unique to both the document and the signer, and it binds them together. A digital certificate, an electronic document that contains the digital signature of the certificate-issuing authority, binds together a public key with an identity and can be used to verify a public key belongs to a particular person or entity.


Wednesday, 28 September 2016

HOW TO CONSUME REST WEBSERVICE IN ORACLE SOA 12c
(REST ADAPTER IN SOA 12c)

1.Create a SOA Project named RESTInvoke


2.Create a Synchronous BPEL process


3.Drag and drop the REST Adapter into the external References


4.Give the name for Rest Reference and choose the appropriate option


5.Enter the Base URI and the resource path of your Rest WebService


6.Create Methods to invoke the WebService


7.Give name for the method,choose the resource path and then choose the operation that you are going to perform.Here I have used GET method.


8.Create URI parameters for the request.


9.Give name for the parameter and choose the style for the parameter.There are two Styles available.

#QUERY parameters are the most common type of parameter, which is appended to the path of the URL when submitting a request.

#  TEMPLATE parameters are a flexible way of parameterizing the actual path of the request.

I have selected query parameter.We can specify the default value also.I have given 77 as the default value.


10.Click finish to complete the rest configuration wizard.


11.Create a wire between BPEL and Rest Adapter


12.Create two json Variables for Invoke input and Invoke Output


13.Drag and drop the invoke activity.


14.Create a wire between invoke and RestReference


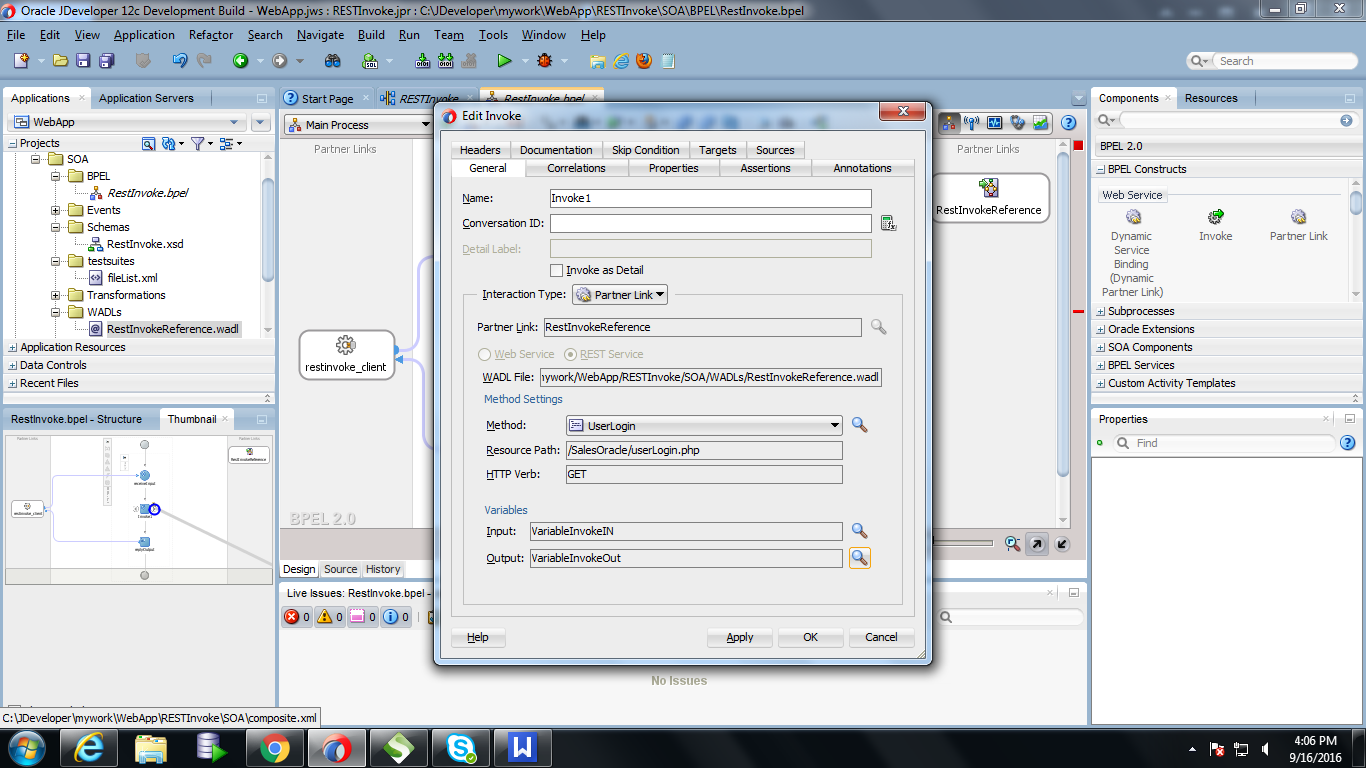
15.Choose the method that we are going to invoke and choose the input and output variables.


16.Map the input variables.


17.Map the Output Variables.


18.Now you can deploy and test the Service.


Tuesday, 27 September 2016

HOW TO CREATE A DECISION TABLE IN ORACLE SOA 12c

1.Create a SOA project DecisionTableDemo


2.Create a synchronous BPEL DecisionTableBpel


3.Drag and drop the Business Rule component


4.Create rule called EmpGradeRules


5.Assign Input and Output for the rules.


6.Create a wire between Bpel and Rules


7.Double Click on the Rules to define the ruleset


8.Click on the + sign in the Rules Designer window near the Decision table to create the decision table


9.Enter the description as EmpGradeTable


10.Create a valueset and attach it to the process fact


11.Choose the RuleSet1 to open the rule Designer window


12.Specify the condition


13.Specify the action


14.Now enter the rules.If the salary is 1000 then the result should be Grade C.If the salary is 2000 then Grade-B.If the salary is 3000 the Grade C.


15.Drag and drop the business rule component in the Bpel


16.Double click on the Business Rule and Select the decision table that we have specified


17.Assign Input and Output facts


18.Now you can deploy and test the process