Saturday 11 February 2017

FILE ADAPTER IN SOA

  Oracle BPEL PM and Mediator include the Oracle File and FTP Adapters. The Oracle File and FTP Adapters enable a BPEL process or a Mediator to exchange (read and write) files on local file systems and remote file systems (through use of the file transfer protocol (FTP)). The file contents can be both XML and non-XML data formats.

There are mainly 4 operations in FILE adpater namely:
  • READ: its an inboun operation that reads a file from given dir path
  • WRITE: outbound operation to write files to a location specified under directory path
  • SYNCHRONUS READ: outbound operation used to read a file in middle of the process
  • LIST FILE: outbound operation to list all the files in a given directory

How to use the FILE adapter in SOA 12c


Let us seen in detail about the steps in File Polling using FILE Adapter in SOA 12c.

1.Create SOA Project Named "FilePolling"


2.Drag and drop file adpater from component pallette to exposed services lane.


3.File adapter configuration window will pop up.Give the service name as "filePollService" and click next.


4.Leave adapter interface default and move next.

If the you have wsdl which will meets our requirement, then we can select using “Import an existing wsdl” else we need to select the “Define from operation and schema”


4.Give the JNDI name for the file Adapter.


5.Since we are reading for new records in a file.Choose operation type as "Read" and click next.Other setting leave as it is.


6.Enter directory path from where file adapter will poll for new files.If you want to delete files after successful read, check "Deletd files after successful retreival".Also, provide the location for archiving the file as well and move next.


7. Now in this part we will provide the name of the files that we want to read. I have given as "test*.*" which means it will read all the files starting with test.Leave other settings default and click next.


8.In this window we define polling frequency which means after how many seconds or minutes our file adapter will poll for new files.Also, if you want your file adapter not to read all the files as they are written on the server, use the minimum file age option.Click next.


9.We will be writing the file as it is read, so choose opaque schema option.


10.Click next and finish.


11.Drag and drop another file adapter this time to external references lane for writing file purposes.File configuration wizard will open up.


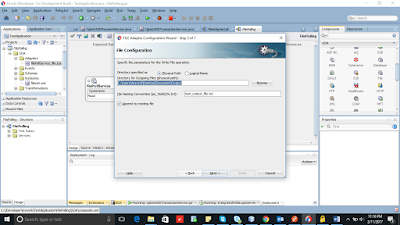
12.Give the Service name as "WriteFile".


13.Leave the adapter interface as default and choose next.


14.Give the JNDI name for the file adapter.


15.Click next again and choose operation name as "Write File" and click next.


16.Specify the directory path where you want your files to be written and file naming convention to be used for files written.If you want that each record is being written to existing file only use "Append to existing File" option. Otherwise leave it default and click next.


17.Select Opaque Schema and click next.Click Finish


18.Drag and drop the BPEL process onto  the components lane.


19.Choose BPEL process as define interface later and give "FileBPELProcess" name to your BPEL process.


20.Wire both file adapters to the BPEL


21.Double click the BPEL process and open up BPEL designer.In the BPEL designer drag and drop one Receive activity and wire it to the "readFile" partner link.


22.Window will pop up for configuring receive activity.As done in JMS adpater tutorial check mark "Create Instance" and create input variable by clicking on "+" icon.


23.Drag and drop invoke activity below receive activity and wire it to the "WriteFile" partner link.


24. Invoke window will pop up.In the same manner like we did for receive activity create input variable for invoke activity.


25.Drag and drop the assing activity between recieve and invoke activity.


26.Double click the assing activity and map receive activity input variable to invoke activity input variable means same contents are being copied to output.


27.Now you can deploy and test the process.


Friday 10 February 2017

HOW TO USE THE JAVA EMBEDDING IN ORACLE BPEL


      The Java Embedding activity allows us to add activities in a BPEL process in which we can write a Java snippet using standard JDK libraries, the BPEL APIs, custom and 3rd party Java Classes included in JAR files in deployed SCA composites (in SCA-INF/lib directory) and Java Classes and libraries available on the Classpath for the SOA Suite run time.


I will show the creation of the Hello World of Java Embedding – a very simple BPEL process that has a string as an input and a string as output. This simple process contains a Java Embedding activity that uses Java to:
  • Write a line of log output to the console
  • Set the name for the composite instance
  • Access the name element in the input parameter
  • Set the value on the output parameter
  • Write an entry in the BPEL audit trail
1.Create a SOA project "JavaEmbedPro"


2.Create a  synchronous Bpel "JavaEmbedBpel"


3.Open the Bpel editor and intialize the output for  the BPEL.


4.Drag and drop the Java Embedding under Oracle Extensions in the BPEL editor.


5.The code in the Java Embedding activity is the following:


6.The XMLElement class used in this snippet is not part of the standard JDK APIs. Therefore, this class has to be imported in the BPEL process, using a special import element:

<import location="oracle.xml.parser.v2.XMLElement" importType="http://schemas.oracle.com/bpel/extension/java"/>


7.Snippet uses a number of the API methods available for use in Java Embedding:
  • getVariableData() - to access variables in BPEL process
  • setVariableData – to set the value on variables
  • addAuditTrailEntry() – add an entry to the audit trail
  • getPreference() – access preference (property)
  • setCompositeInstanceTitle() - set the title that is displayed in the EM FMW Console
  • getInstanceId( ) -get value of Unique ID associated with this BPEL process instance
  • setStatus(), setTitle(), setCreator รข€“ set meta data on process instance
  • setIndex() - set up to 6 index variables that can be used to query process instances through the BPEL API
8.Now we can deploy and test the process


Input Payload


Output Payload


Tuesday 7 February 2017

HOW TO CONVERT THE EXCEL FILE INTO PDF USING JAVA


Please find the below code to convert the Excel file into PDF using Java\


/*
 * To change this license header, choose License Headers in Project Properties.
 * To change this template file, choose Tools | Templates
 * and open the template in the editor.
 */
package excelConversion;

/**
 *
 * @author aravindkumar.k
 */
import java.io.FileInputStream;
import java.io.*;
import org.apache.poi.hssf.usermodel.HSSFWorkbook;
import org.apache.poi.hssf.usermodel.HSSFSheet;
import org.apache.poi.ss.usermodel.*;
import java.util.Iterator;
import com.itextpdf.text.*;
import com.itextpdf.text.pdf.*;

public class excel2pdf {
        public static void main(String[] args) throws Exception{
                //First we read the Excel file in binary format into FileInputStream
                FileInputStream input_document = new FileInputStream(new File("D:\\Test\\ADF_Doc.xls"));
                // Read workbook into HSSFWorkbook
                HSSFWorkbook my_xls_workbook = new HSSFWorkbook(input_document);
                // Read worksheet into HSSFSheet
                HSSFSheet my_worksheet = my_xls_workbook.getSheetAt(0);
                // To iterate over the rows
                Iterator<Row> rowIterator = my_worksheet.iterator();
                //We will create output PDF document objects at this point
                Document iText_xls_2_pdf = new Document();
                PdfWriter.getInstance(iText_xls_2_pdf, new FileOutputStream("Excel2PDF_Output.pdf"));
                iText_xls_2_pdf.open();
                //we have two columns in the Excel sheet, so we create a PDF table with two columns
                //Note: There are ways to make this dynamic in nature, if you want to.
                PdfPTable my_table = new PdfPTable(2);
                //We will use the object below to dynamically add new data to the table
                PdfPCell table_cell;
                //Loop through rows.
                while(rowIterator.hasNext()) {
                        Row row = rowIterator.next();
                        Iterator<Cell> cellIterator = row.cellIterator();
                                while(cellIterator.hasNext()) {
                                        Cell cell = cellIterator.next(); //Fetch CELL
                                        switch(cell.getCellType()) { //Identify CELL type
                                                //you need to add more code here based on
                                                //your requirement / transformations
                                        case Cell.CELL_TYPE_STRING:
                                                //Push the data from Excel to PDF Cell
                                                 table_cell=new PdfPCell(new Phrase(cell.getStringCellValue()));
                                                 //feel free to move the code below to suit to your needs
                                                 my_table.addCell(table_cell);
                                                break;
                                        }
                                        //next line
                                }
               
                }
                //Finally add the table to PDF document
                iText_xls_2_pdf.add(my_table);                      
                iText_xls_2_pdf.close();              
                //we created our pdf file..
                input_document.close(); //close xls
        }
}

HOW TO WRITE THE DATABASE THE RECORDS ON TO THE TEXT FILE


Please find the below code to wite the database record on to the text File


/*
 * To change this license header, choose License Headers in Project Properties.
 * To change this template file, choose Tools | Templates
 * and open the template in the editor.
 */
package test;

import com.jcraft.jsch.Channel;
import com.jcraft.jsch.ChannelSftp;
import com.jcraft.jsch.JSch;
import com.jcraft.jsch.Session;
import java.io.BufferedWriter;
import java.io.File;
import java.io.FileInputStream;
import java.io.FileWriter;
import java.sql.Connection;
import java.sql.DriverManager;
import java.sql.ResultSet;
import java.sql.Statement;
import java.text.DateFormat;
import java.text.SimpleDateFormat;
import java.util.Date;
import java.sql.PreparedStatement;

/**
 *
 * @author Aravind
 */
public class Test {
    public static void main(String args[]){
        try{  
                Class.forName("oracle.jdbc.driver.OracleDriver");  
               
 Connection con; con=DriverManager.getConnection("jdbc:oracle:thin:@localhost:1521:orcl","system","system");  
                String selectTableSQL = "SELECT *from employees";
                Statement statement =con.createStatement();
                PreparedStatement ps=null;  
                String updateQuery="";
                
                ResultSet rs = statement.executeQuery(selectTableSQL);
                
                File f = new File("TransactionDetails");
               
                     
                     DateFormat df = new SimpleDateFormat("dd.MM.yy_HH.mm.ss");
                     Date dateobj = new Date();
                     String date=(df.format(dateobj)).toString();
                     String fileName="TransactionDetails/emp"+date+".txt";


                f.mkdir();
                BufferedWriter bw = new BufferedWriter(new FileWriter(fileName));
                
                StringBuilder  details = new StringBuilder();
                
               details.append(System.getProperty("line.separator"));
                
                
                while (rs.next()) {
                    
                    details.append(rs.getString("empID") + "  " + rs.getString("empName") + "  "
                        +rs.getString("empSalary"));
                    
                    details.append(System.getProperty("line.separator"));
                    
                }
                bw.write(details.toString());
                bw.flush();
                System.out.println("Success");
                
            
            }
            catch(Exception e){
                System.out.println(e);
            
            }
    }
}

How to import the Excel file into Oracle Table Using Java


Please find the below code to import the Excel File into the Oracle Table


/*
 * To change this license header, choose License Headers in Project Properties.
 * To change this template file, choose Tools | Templates
 * and open the template in the editor.
 */
package test;

import java.sql.Connection;
import java.sql.DriverManager;
import java.sql.PreparedStatement;
import org.apache.poi.ss.usermodel.Row;
import org.apache.poi.xssf.usermodel.XSSFSheet;
import org.apache.poi.xssf.usermodel.XSSFWorkbook;

/**
 *
 * @author Aravind
 */
public class App {
    public static void main(String args[]){
        try { 
                Class.forName("oracle.jdbc.driver.OracleDriver");  
                Connection con=DriverManager.getConnection("jdbc:oracle:thin:@localhost:1521:orcl","system","system");
                System.out.println("");
                con.setAutoCommit(false);
                PreparedStatement pstm = null;
                String destDir="C:\\Users\\Desktop\\test.xlsx";
                System.out.println("destDir==> "+destDir); 
                XSSFWorkbook workBook = new XSSFWorkbook(destDir); 
                XSSFSheet sheet = workBook.getSheetAt(0); 
                int totalRows = sheet.getPhysicalNumberOfRows(); 
                System.out.println("total no of rows >>>>"+totalRows); 
                Row row;
                for (int i = 1; i <= sheet.getLastRowNum(); i++) {
                    row = (Row) sheet.getRow(i);
                    String name = row.getCell(0).getStringCellValue();
                    String add = row.getCell(1).getStringCellValue();
                    int  contact = (int) row.getCell(2).getNumericCellValue();
                    String email = row.getCell(3).getStringCellValue();
                    System.out.println(name+":My EMAIL address is "+email);
                    String sql = "INSERT INTO TEST_EMPLOYEE (NAME, ADDRESS, CONTACT, EMAIL) VALUES('" + name + "','" + add + "'," + contact + ",'" + email + "')";
                    pstm = (PreparedStatement) con.prepareStatement(sql);
                    pstm.execute();
                    System.out.println("Import rows " + i);
                }
                con.commit();
                pstm.close();
                con.close();
                System.out.println("Success import excel to my table");
        }
        catch(Exception e){
        }
    }
}